Getting Started With Serverpod Mini and Globe
 Majid HajianHead of Developer Relations & Community @Globe
Introduction
Building robust backends to power your Flutter applications can sometimes feel overly complex. If you’re seeking an easy solution, especially for smaller projects or rapid prototyping, Serverpod mini offers a compelling option. This framework leverages the power of Dart and simplifies backend development.
In this article, we’ll dive into creating a Serverpod mini backend and effortlessly deploying it using Globe.dev.
Note*: Globe now supports both mini and full Serverpod! Head over to our [blog post] (https://globe.dev/blog/serverpod-full/) to learn how to set it up, explore its features, and see the benefits of using Full Serverpod..
What is and why use Serverpod mini
Serverpod mini is a lightweight flavor of the full-fledged Serverpod backend framework. It’s designed with a focus on ease of use. A key difference is that Serverpod Mini does not require an external PostgreSQL database, making setup incredibly straightforward. Since it’s built with Dart, it’s a natural fit for Flutter developers aiming to create a unified tech stack.
Here’s why you might want to consider Serverpod mini:
- Simplicity: Its core appeal lies in simplifying development, allowing you to directly focus on your backend logic.
- Flutter Integration: Seamless communication between your Flutter frontend and Dart backend becomes a breeze.
- Performance: Serverpod mini is performant and built to handle numerous requests.
- Scalability (With Caveats): While ideal for smaller projects, if your backend requirements grow significantly, you have a potential migration path to the full Serverpod framework.
Dart Backend with Serverpod mini
Now that you’re familiar with the core concepts, let’s delve into building a simple Serverpod mini backend for your project. We’ll walk through the process step-by-step:
Project Setup
This establishes the foundation of your Serverpod mini project, creating the necessary directory structure and configuration.
- Ensure you have Dart installed (check with
dart --versionin your terminal). If not, follow the official installation guidehttps://dart.dev/get-dart. - Install the Serverpod mini command-line tool globally:
dart pub global activate serverpod_cli 2.0.0-alpha.1

Then, you can create a project:
serverpod create minipodglobe --mini

Serverpod mini will generate a project with three primary directories:
minipodglobe_server:This is where you’ll write all your backend code. Focus on defining data models, creating endpoints, and handling server-side logic.minipodglobe_flutter:This contains a basic Flutter application ready to interact with your server.minipodglobe_client:Holds automatically generated code that facilitates seamless communication between your Flutter application and the Serverpod mini backend.
.
├── minipodglobe_client
│   ├── CHANGELOG.md
│   ├── README.md
│   ├── analysis_options.yaml
│   ├── dartdoc_options.yaml
│   ├── doc
│   ├── lib
│   ├── pubspec.lock
│   └── pubspec.yaml
├── minipodglobe_flutter
│   ├── README.md
│   ├── analysis_options.yaml
│   ├── android
│   ├── ios
│   ├── lib
│   ├── linux
│   ├── macos
│   ├── minipodglobe_flutter.iml
│   ├── pubspec.lock
│   ├── pubspec.yaml
│   ├── test
│   ├── web
│   └── windows
└── minipodglobe_server
    ├── CHANGELOG.md
    ├── README.md
    ├── analysis_options.yaml
    ├── bin
    ├── lib
    ├── pubspec.lock
    └── pubspec.yaml
Exploring our Project
Open the project in your favorite Code Editor, and open the minipodglobe_server/lib/server.dart file. This is where our Serverpod Mini application bootstraps.
import 'package:serverpod/serverpod.dart';

import 'src/generated/protocol.dart';
import 'src/generated/endpoints.dart';

// This is the starting point of your Serverpod server.
void run(List<String> args) async {
  // Initialize Serverpod and connect it with your generated code.
  final pod = Serverpod(
    args,
    Protocol(),
    Endpoints(),
  );

  // Start the server.
  await pod.start();
}
Listen on PORT from Environment Variables.
By default, Serverpod Mini will start our server on port 8080. We’ll need to change this. Let’s modify our server to listen on port assigned from Platform Environments. Our
server code should now look like this.
import 'dart:io';

import 'package:serverpod/serverpod.dart';

import 'src/generated/protocol.dart';
import 'src/generated/endpoints.dart';

// This is the starting point of your Serverpod server.
void run(List<String> args) async {
  // Initialize Serverpod and connect it with your generated code.

  final port = int.parse(Platform.environment['PORT'] ?? '8080'); // listen on assigned port
  final config = ServerConfig(
    port: port,
    publicScheme: 'http',
    publicHost: 'localhost',
    publicPort: port,
  );

  final pod = Serverpod(
    args,
    config: ServerpodConfig(apiServer: config), // custom serverpod config
    Protocol(),
    Endpoints(),
  );

  // Start the server.
  await pod.start();
}
Exploring Server Endpoints
When you create a Serverpod Mini project, you get an example/hello endpoint by default. In your server directory, open lib/src/endpoints/example_endpoint.dart file.
import 'package:serverpod/serverpod.dart';

// This is an example endpoint of your server. It's best practice to use the
// `Endpoint` ending of the class name, but it will be removed when accessing
// the endpoint from the client. I.e., this endpoint can be accessed through
// `client.example` on the client side.

// After adding or modifying an endpoint, you will need to run
// `serverpod generate` to update the server and client code.
class ExampleEndpoint extends Endpoint {

  Future<String> hello(Session session, String name) async {
    return 'Hello $name';
  }
}
Let’s modify this to respond Have some 🍕, $name with the name variable passed.
class ExampleEndpoint extends Endpoint {

  Future<String> hello(Session session, String name) async {
    return 'Have some 🍕, $name';
  }
}
Starting the Server
Navigate to your server directory:
cd myminipod/myminipod_server
then, Execute the main Dart file
dart bin/main.dart
This fires up your Serverpod mini backend, making it ready to receive requests from your client application.
Now open http://localhost:8080/example/hello?name=Majid in your web browser.

Running the Flutter App
Change into the Flutter app directory:
cd myminipod/myminipod_flutter
Start the app (targeting a Chrome browser for this example):
flutter run -d chrome
The Flutter app is designed to communicate with the running Serverpod mini backend. Start experimenting and building out your project!
Deployment with Globe.dev
Globe.dev makes deploying your Serverpod mini backend incredibly simple. You can both deploy Serverpod mini backend and Flutter web to Globe.
Our backend with Serverpod mini, being a pure logic implementation, does not involve any external dependencies such as databases, caches, or complex integrations, making it an ideal candidate for deployment on Globe’s platform.
Here’s how you can get started with Globe:
-
Install Globe CLI: Globe provides a command-line interface (CLI) for easy interaction. To install it, run:
dart pub global activate globe_cliThis command installs the Globe CLI globally using Dart’s package manager.
-
Login to Globe: Once the Globe CLI is installed, authenticate with your Globe account:
globe loginFollow the prompts to log in. If you don’t have a Globe account, you’ll be guided to create one.
-
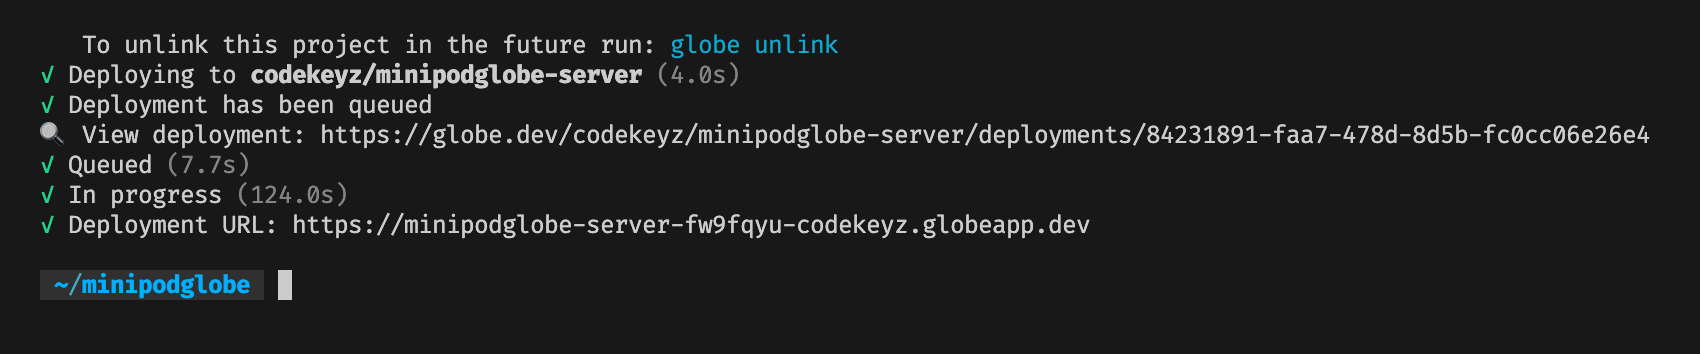
Deploy Your Application: Navigate to the root of your project directory.
Run:
globe deployFollow the on-screen instructions to deploy your Dart backend. Globe will automatically detect and apply our
Serverpod Minipreset to make deployment even easier.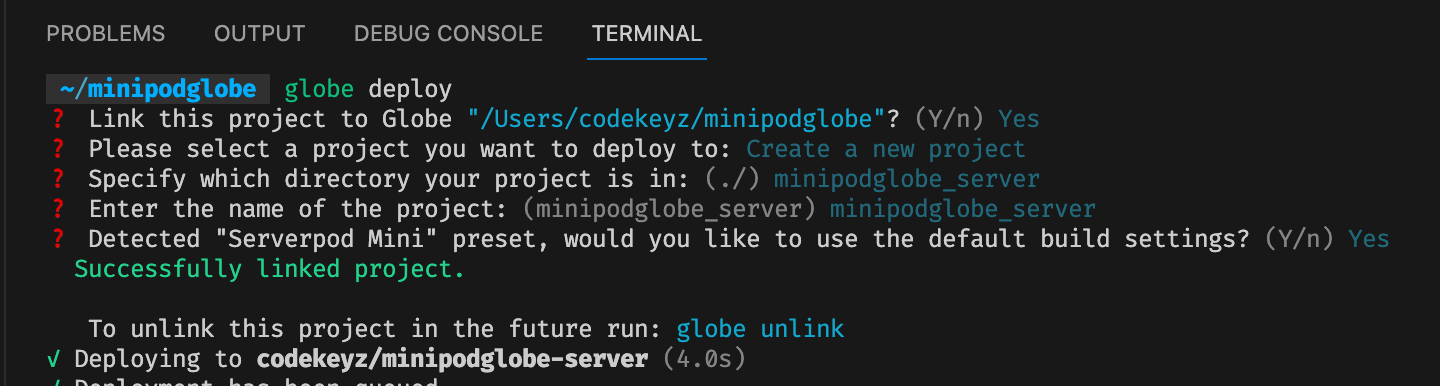
Once deployment is over, you will have access to your production link. For example, in my utility backend, here is the link https://minipodglobe-server-fw9fqyu-codekeyz.globeapp.dev/
-
Monitor and Manage Your Deployment: Globe provides tools to monitor and manage your application after deployment. You can easily view logs, update your deployment, or roll back to previous versions if needed. Check the Globe Dashboard.


Globe also helps connect your GitHub repository and lets you deploy automatically by git push.

One of the useful features in Globe is the power to give you a preview link with each deployment or git push. You can test your feature before you deploy your application to production; you need to run globe deploy. This feature is much more challenging to achieve in the typical ways we explored in this article.

With Globe, deploying your Dart backend becomes a straightforward and hassle-free process. You can rapidly deploy, update, and manage your applications, allowing you to focus more on development and less on deployment complexities. Globe handles the underlying details, offering a user-friendly approach to deploying Dart backends in the cloud.
Globe also supports Flutter web deployment out of the box. Just follow the same steps as the backend deployment in your Flutter application root folder.

Source code
You can find the final source code here.
Conclusion
Serverpod mini and Globe.dev form a potent combination for rapidly developing and deploying Dart backends for your Flutter apps. Feel free to experiment and explore what you can build!