Getting Started Running Dart on the Server
 Majid HajianHead of Developer Relations & Community @Globe
Introduction
Dart is gaining popularity among developers due to its efficiency and versatility for both front-end and back-end development. It has already proven an excellent choice for Flutter and continues to mature for back-end development. Additionally, there are already Dart frameworks available for writing client applications, similar to React or other JavaScript frameworks.
If you’re new to writing Dart for the backend, there may be several components that you still need to discover. This tutorial is designed to examine using Dart to construct backend systems comprehensively. I aim to help you with the necessary skills to take advantage of Dart’s full-stack capabilities, guiding you through server-side programming, RESTful APIs, database interactions, and other important topics.
Full-Stack Dart
Full-stack Dart refers to using Dart programming language to develop both the front end (perhaps you have seen Flutter) and the back end of an application. Dart offers a unique advantage to developers by allowing them to compile JavaScript for front-end development and run on the server side, enabling them to work across the entire stack with a single programming language. Using Dart for backend projects has several advantages, especially when paired with Flutter, but not limited to it:
- Unified Language: Using Dart for both frontend and backend simplifies the development process, as you only need to be proficient in one language for all parts of your application.
- Performance: Dart is designed for performance. Its ability to compile to native code for the backend and to JavaScript for the front end ensures high efficiency.
- Productivity: Dart’s syntax is clear and concise, which makes it easy to read and write. Its robust libraries and tools, like the Dart SDK and Flutter framework, enhance productivity.
- Strong Ecosystem: Dart benefits from strong support from Google, primarily through its integration with the Flutter framework for building natively compiled applications for mobile, web, and desktop from a single codebase.
- Community and Support: As Dart grows in popularity, so does its community. This means better support, more libraries, and a wealth of shared knowledge.
Backend Development with Dart
When starting backend development with Dart, it’s important to understand fundamental concepts and components. Here are the key areas with brief explanations:
- Creating and Managing a Web Server: Learn to set up a basic web server using Dart frameworks like Shelf, Serverpod, or DartFrog. This involves handling HTTP requests, routing, and sending responses.
- Stateless Architecture: Understand the principles of stateless backend design, where each request is processed independently, enhancing scalability and performance.
- Database Connectivity and ORM: Familiarize yourself with connecting Dart applications to databases. Learn to perform CRUD operations and use Object-Relational Mapping (ORM) for database interaction.
- Building RESTful APIs: Develop skills in creating RESTful APIs that handle JSON data and use HTTP methods for resource management. This is a critical part of backend development for enabling client-server communication.
- WebSocket Communication: Understand WebSockets for real-time, bidirectional communication between the client and server. This is essential for features like chat applications or live updates.
- Security Practices: Learn to implement security measures, including authentication, authorization, and data protection. Understanding HTTPS, managing environment variables, and handling user data securely is key.
- Testing and Debugging: Develop a strategy for writing tests (unit, integration) and debugging your Dart backend code. This ensures the reliability and maintainability of your application.
- Deployment and Server Management: Acquire knowledge on deploying Dart applications to various environments, managing server resources, and optimizing performance. Providers like AWS, GCP, or easy-to-deploy services like Globe can benefit greatly.
- Error Handling and Logging: Learn best practices for handling errors and maintaining logs, which are critical for diagnosing and resolving issues in backend applications.
- Working with External APIs and Services: Know how to integrate and interact with third-party APIs and services, an often necessary component in modern web applications.
More must be in the list above, but you are good to start if you know these. Let’s dive deep into each of these.
Creating and Managing a Web Server
Setting up and managing a web server in Dart involves several key steps. While you can use pure Dart to handle HTTP requests and responses, using a package that makes it easier for you is much easier. As of writing this tutorial, three options are greatly supported:
- Shelf: A modular, lightweight framework for creating custom server solutions with middleware support. Created and maintained by the Dart team.
- DartFrog: A minimalistic framework that focuses on simplicity and rapid development, technically built on top of the Shelf.
- Serverpod: A full-fledged backend framework with all requirements, including database management and monitoring.
For this tutorial, I will stick to Shelf, and once you are comfortable with it, you can select other options and explore.

In the client-server architecture, the server handles client requests and provides appropriate responses. These requests are made using various HTTP methods, each serving a specific purpose:
- GET: Retrieves data from the server. Used when accessing web pages or fetching data.
- POST: Sends data to the server. Commonly used for submitting forms.
- PUT: Updates existing data on the server.
- DELETE: Removes data from the server.
- PATCH: Partially updates existing data on the server.
- OPTIONS: Describe the communication options for the target resource.
When a client, if it’s server-rendered, such as a web browser, requests a URL like globe.dev/dashboard, the server receives this request and routes it to the appropriate handler based on the URL path (/dashboard) and the HTTP method (e.g., GET). This routing mechanism is fundamental to web server operation.
Let’s talk about Single Page Applications (SPA) and how they work. In this application, all the routes are returned to the index.html file, which acts as the entry point for serving responses. However, instead of hitting the server every time, each route is now handled by the client-side JavaScript in the browser. This means that the server is no longer involved in processing each request. In this tutorial, we do not focus on SPAs.

In many cases, servers do not return an entire web page in HTML format. Instead, they often return data in various formats such as JSON, Text, XML, etc. This approach is particularly prevalent in developing APIs (Application Programming Interfaces), where the client application (like a mobile app or a web frontend) is separated from the backend application. In such architectures, the server’s primary role is to provide data and services to the client application rather than serving complete web pages.
Developing APIs has become increasingly common, especially with the rise of modern web and mobile applications. One popular architectural style for creating these APIs is REST (Representational State Transfer), or RESTful APIs.
RESTful APIs
REST is an architectural style that defines a set of constraints for creating web services. RESTful APIs are designed around the following principles:
- Resource-Based: In REST, every data or functionality is considered a resource, identifiable by a unique URI (Uniform Resource Identifier).
- Stateless Operations: Each request from a client to a server must contain all the information needed to understand and process the request. The server does not store the session state between requests.
- Use of HTTP Methods: RESTful services use standard HTTP methods (GET, POST, PUT, DELETE, PATCH) to perform operations on resources.
- Representation of Resources: Resources can be represented in various formats such as JSON, XML, or plain text. The client and server negotiate the content format (content negotiation) for the data exchange.
- Stateless Client-Server Communication: The client and server interact statelessly, meaning the server does not need to remember the client’s state between requests.

When developing the backend of a Dart application, building RESTful APIs requires configuring routes and handlers for different HTTP methods and URIs, managing requests, and sending back the appropriate representations of resources.
Before we continue building a RESTful backend together, let me explain an essential topic in backend development: stateless versus stateful architecture.
Stateless and Stateful Architecture
In backend development, the terms “stateless” and “stateful” refer to how a server remembers or forgets information about user interactions. Understanding these concepts is essential for designing web services and APIs.
Stateless Architecture
In a stateful architecture, the server keeps track of the user’s state through multiple requests. This means the server remembers previous interactions and can be used in subsequent requests. Stateful architectures are commonly used in applications where continuous user state is necessary, such as online banking systems, e-commerce platforms, and interactive web applications. To accomplish this, the server needs to keep track of the user’s actions, preferences, and transactions over time. This information is stored in memory, databases, or other storage mechanisms. However, maintaining session information in this way can lead to complexities with scaling and load-balancing, as the user’s state must be consistently available across all server instances.
Stateless Architecture
A stateless architecture treats every request as a separate and independent transaction. The server does not store any information about previous requests. This type of architecture is well-suited for applications where each request can be handled independently, which is often the case in RESTful, microservices, and serverless computing. Stateless servers do not need to manage or synchronize session state, which makes it easier to scale them horizontally. They rely on the client to provide all necessary context for each request using tokens or parameters.
Although each type of architecture has specific use cases, stateless architecture has gained popularity. Let’s now explore stateless architecture.
Stateless Architecture in Backend Development
Stateless architecture is a key concept in modern backend development, mainly when designing scalable, high-performance web services. In a stateless backend, each request is processed independently, without relying on any stored state from previous requests. This approach has several advantages and implications:
- Independence of Requests: Each request is self-contained and must include all necessary information for processing. The server does not rely on prior knowledge or state from previous interactions.
- Scalability: Stateless architecture simplifies scaling the application. Since each request is independent, it’s easier to distribute the load across multiple servers or instances. There’s no need to maintain a consistent state across these servers, reducing complexity and overhead.
- Simplicity in Session Management: Storing the session state on the server is necessary for the design and maintenance of the backend to become more straightforward. The client should send Any required session data with each request, often as tokens or cookies.
- Enhanced Performance: Stateless servers can handle requests more efficiently as they don’t need to retrieve or synchronize session state. This leads to faster response times and better overall performance.
- Reliability and Fault Tolerance: The lack of dependency on a server’s state makes the system more robust. Others can handle the request if a server instance fails without losing session data or context.
When developing a stateless backend with Dart, consider the following practices:
- Stateless APIs: Design APIs to be stateless by ensuring that all necessary information for processing a request is included in the request itself.
- Use of Tokens for Authentication: Implement token-based authentication (like JWT - JSON Web Tokens) to handle user sessions. The client sends the token with each request, allowing the server to authenticate and authorize without maintaining the session state.
- Load Balancing: Utilize load balancers to distribute incoming requests evenly across multiple server instances. This is effective because the stateless nature of the backend means any server can handle any request.
- Caching Strategies: Implement caching mechanisms wisely. While the backend is stateless, caching specific data can improve performance. Ensure that cached data does not introduce statefulness or dependencies between requests.
- Database Design: Design your database and data access patterns to support stateless operations. Avoid relying on the server’s memory to store transient state.
The stateless approach can be applied across various layers and components of Dart backend architecture:
- Database Layer: Handles data storage and retrieval. In a stateless architecture, the database is queried directly with each request without relying on the server-side session state. The database can be SQL, such as PostgreSQL, or NoSQL, such as MongoDB.
- Cache Layer: Used for temporarily storing frequently accessed data to improve performance. Even though caching is a form of state, it’s managed independently of the user’s session and doesn’t affect the statelessness of the application. REDIS is one of the examples that is widely used for caching.
- Queue System: Manages asynchronous tasks and message passing, often used in distributed systems. Queues help in decoupling components, which aligns well with stateless design principles. Kafka is one of the popular choices.
- Business Logic Layer: Contains the core functionality of the application, including algorithms, data processing, and decision-making. In a stateless backend, business logic must be designed to execute independently for each request. This component either has access to a database or cache data, or it is pure business logic that doesn’t connect with any other component and applies only what is necessary.
Focusing on Pure Business Logic
A stateless backend with a business logic layer that operates independently and has no direct connection to other components like databases, caches, or queues can be referred to as a “Pure Business Logic Layer” or a “Service Layer.” In some contexts, it might also be called an “Application Layer” or a “Domain Layer,” emphasizing its role in encapsulating the core application or domain-specific logic.
This layer strictly focuses on the application’s business rules and algorithms. It processes and transforms data, performs validations, and executes business operations, all without concerning itself with data persistence, caching strategies, or external communication mechanisms. The primary goal of this layer is to implement the application’s business logic in a clean, maintainable, and scalable manner.
Here are some of the examples:
- Data Transformation: Converting data formats, filtering, or aggregating data as per business rules.
- Validation and Verification: Ensuring that incoming data meets specific criteria or standards.
- Algorithmic Processing: Performing calculations or algorithm-based operations on data.
Build a RESTful API with Dart
So far, you have learned about the principles of stateless backend development and RESTful APIs. Creating a RESTful API is an excellent way to start with backend development in Dart. RESTful APIs allow clients to interact with your application using standard HTTP methods. This section will guide you through building a simple RESTful API with Dart.
For this tutorial, we will create fake RESTful APIs that can be used for testing or development processes in any application. This backend would have no access to any database or cache and handle all requests independently. It’s a great scenario to build and learn the Dart backend.
Planning
We aim to create a fake RESTful API service that can be used in testing or development, found at https://dart-fake-api.globeapp.dev/. To achieve this, you must understand key terms, such as resources, CRUD operations, HTTP methods, and endpoints.
Resources:
- Resources represent entities or data objects in a RESTful API. Our mock API has resources like
Users,Companies, andPosts.
CRUD Operations and HTTP Methods
- CRUD stands for Create, Read, Update, Delete, which are fundamental operations for data management.
- HTTP Methods: These are used to perform CRUD operations in a RESTful API. Let’s examine this with the
Usersresource:- GET
/api/v1/users: Read operation. Retrieves a list of users. - POST
/api/v1/users: Create operation. Adds a new user. - PUT
/api/v1/users/{id}: Update operation. Modifies an existing user identified by{id}.{id}is dynamic in this case and can be changed. - DELETE
/api/v1/users/{id}: Delete operation. Removes the user with the specified{id}.
- GET
Endpoints
- Endpoints are specific URLs where clients can access and perform operations on resources. They combine a URI with an HTTP method. For example, the endpoint
POST /API/v1/companiesallows clients to create new companies.
In planning our mock API, we’ll focus on one resource, Users, to illustrate these RESTful principles clearly. This approach will cover endpoints and operations for creating, reading, updating, and deleting user data, providing a practical understanding of building RESTful APIs. Once you are comfortable, you can continue adding more resources and CRUD operations.
Getting Started
We’ll set up the development environment and create a basic project structure to build our RESTful API in Dart. This initial setup lays the foundation for developing our API endpoints and implementing CRUD operations.
Create a New Dart Project:
- Open your terminal or command prompt.
- Navigate to the directory where you want to create your project.
- Run
dart create -t server-shelf my_restful_apito generate a new Dart project. This command creates a directory namedmy_restful_apiwith a basic Dart project structure.
.
├── CHANGELOG.md
├── Dockerfile
├── README.md
├── analysis_options.yaml
├── bin
│   └── server.dart
├── pubspec.lock
├── pubspec.yaml
└── test
    └── server_test.dart
- Inside your project folder, you’ll have several subfolders and files. The main application code will go into the
bindirectory, typically in a file namedserver.dart. - You can create additional directories like
libfor shared code andmodelsfor data models.
Adding Dependencies:
-
We’ll use Shelf, so add the following lines under
dependencies:dependencies: shelf: ^1.4.0 shelf_router: ^1.1.0 ``` -
Run
dart pub getin your project directory to install the specified packages.
Running a Simple Server
- Once you created the project, the
server.darthandles a basic server logic.
import 'dart:io';

import 'package:shelf/shelf.dart';
import 'package:shelf/shelf_io.dart';
import 'package:shelf_router/shelf_router.dart';

// Configure routes.
final _router = Router()
  ..get('/', _rootHandler)
  ..get('/echo/<message>', _echoHandler);

Response _rootHandler(Request req) {
  return Response.ok('Hello, World!\n');
}

Response _echoHandler(Request request) {
  final message = request.params['message'];
  return Response.ok('$message\n');
}

void main(List<String> args) async {
  // Use any available host or container IP (usually `0.0.0.0`).
  final ip = InternetAddress.anyIPv4;

  // Configure a pipeline that logs requests.
  final handler = Pipeline().addMiddleware(logRequests()).addHandler(_router);

  // For running in containers, we respect the PORT environment variable.
  final port = int.parse(Platform.environment['PORT'] ?? '8080');
  final server = await serve(handler, ip, port);
  print('Server listening on port ${server.port}');
}
Let’s analyze this code snippet as it shows how you should create different endpoints and handle different HTTP methods.
In Shelf, a router manages and directs HTTP requests to different handlers based on the request’s URL path. The router acts as a dispatcher that matches incoming requests to the appropriate route and executes the corresponding handler.
final _router = Router()
  ..get('/', _rootHandler)
  ..get('/echo/<message>', _echoHandler);
Router(): Creates a new instance of theRouterclass.get: Adds a route for GET requests. The first argument is the URL path pattern, and the second is the handler function that should be executed when the route is matched. Other methods exist, such asput,post,delete, etc.'/': The root path. Requests to the base URL of the server will be directed to_rootHandler.'/echo/<message>': A route with a path parametermessage. This allows the server to handle requests to/echowith a variable part in the URL, which is captured and made available in the handler.
Request handlers are functions that process incoming HTTP requests and return responses. Each handler is associated with a specific route.
Response _rootHandler(Request req) {
  return Response.ok('Hello, World!\n');
}

Response _echoHandler(Request request) {
  final message = request.params['message'];
  return Response.ok('$message\n');
}
_rootHandler: A simple handler for the root route. It returns a plain text response “Hello, World!“._echoHandler: A handler for the/echo/<message>route. It extracts themessagepath parameter from the request and returns it in the response.request.paramsare used to access route parameters.
Middleware in Shelf is a powerful feature that allows you to intercept and process requests and responses. Middleware can perform various tasks, such as logging, authentication, error handling, and modifying request/response objects.
final handler = Pipeline().addMiddleware(logRequests()).addHandler(_router);
Pipeline(): A Shelf class used to compose a series of middleware and a handler.addMiddleware(logRequests()): Adds thelogRequestsmiddleware, which logs incoming requests to the console. Middleware functions take aHandlerand return aHandler.addHandler(_router): Adds the router as the final handler in the pipeline. The router will dispatch the request to the appropriate route handler.
The rest of the main function also tries to get these routes and attach them to a web server on a specific port.
void main(List<String> args) async {
  final ip = InternetAddress.anyIPv4;
  final handler = Pipeline().addMiddleware(logRequests()).addHandler(_router);
  final port = int.parse(Platform.environment['PORT'] ?? '8080');
  final server = await serve(handler, ip, port);
  print('Server listening on port ${server.port}');
}
- The server listens on
InternetAddress.anyIPv4, which allows connections from any IP address. - A pipeline is configured with
logRequests()middleware for logging and_routeras the request handler. - The server port is set to the value of the
PORTenvironment variable or defaults to8080. - The
servefunction starts the server, and a message is printed to the console indicating the listening port.
After learning how to create routes and handle requests and responses, let’s move on.
Testing the Server
- Execute
dart run bin/server.dartin the terminal within your project directory.
~/.../dart_fake_api  > dart run bin/server.dart
Server listening on port 8080
- Test the server by accessing
http://localhost:8080in your browser or using a tool like Postman. You should get familiar with tools that help you test RESTful APIs. Postman is a good option, but there are other tools; you should find your favorite one.
With these steps, you’ll have a basic Dart environment and a simple server running. This is the starting point for building the RESTful API with various endpoints and CRUD functionalities.
Users Resource
To create the User resource for our RESTful API in Dart, we’ll use the [faker_dart](https://pub.dev/packages/faker_dart) package to generate fake user data. This approach allows us to simulate a database with realistic data. We’ll implement functions to generate user data, handle CRUD operations, and define the corresponding endpoints.
Tidy up
Let’s remove the endpoints that it was created automatically and then move router to another file router.dart
final router = Router()
Then, remove everything else that we do not need. Ensure you import router from this file in server.dart
// .. other imports
import 'router.dart';

main(){
// ...
final handler = Pipeline().addMiddleware(logRequests()).addHandler(router);
// ...
}
Generating Fake User Data with faker_dart
First, add faker_dart to your pubspec.yaml under dependencies and run dart pub get to install it:
dependencies:
  faker_dart:
Then, create functions to generate fake user data. I will create a users.dart file to organize it better.
import 'package:faker_dart/faker_dart.dart';

final faker = Faker.instance;

List<Map<String, dynamic>> generateUsers(int count) {
  return List.generate(count, (_) => createUser());
}

Map<String, dynamic> createUser() {
  return {
    'id': faker.datatype.uuid(),
    'firstName': faker.name.firstName(),
    'lastName': faker.name.lastName(),
    'email': faker.internet.email(),
    'address': faker.address.streetAddress(),
    'bio': faker.lorem.sentence(),
    'phone': faker.phoneNumber.phoneNumber(),
    'image': faker.image.image(),
    'company': faker.company.companyName(),
    'job': faker.name.jobTitle(),
    'website': faker.internet.url(),
    'createdAt': faker.date.past(DateTime.now()).toString(),
    'updatedAt': faker.date.past(DateTime.now()).toString(),
  };
}
Generate an initial list of 50 fake users:
var users = generateUsers(50);
Implementing CRUD Operations
Create functions to handle CRUD operations for the User resource:
getUsers Function - Retrieve a List of Users: GET /api/v1/usersFetches and returns a list of all users.
Response getUsers(Request request) {
  // Convert the users list to JSON and return as response
  final jsonUsers = jsonEncode(users);
  return Response.ok(jsonUsers, headers: {'Content-Type': 'application/json'});
}
You can see the result in action in your browser or using Postman

getUserById Function - Retrieve a Single User by ID: GET /api/v1/users/<id> Fetches and returns a specific user based on the provided ID.
Response getUserById(Request request) {
  final id = request.params['id'];

  final user = users.firstWhere(
    (obj) => obj['id'] == id,
    orElse: () => <String, String>{}, // return an empty map if no item is found
  );

  if (user['id'] == null) {
    return Response.notFound('User not found');
  }

  return Response.ok(
    jsonEncode(user),
    headers: {'Content-Type': 'application/json'},
  );
}
In the previous screenshot, if you copy the ID and add it to a new endpoint, now you will be able to receive the user.
addUser Function - Create a New User: POST /api/v1/usersAdds a new user to the list based on the data received in the request body.
Future<Response> addUser(Request request) async {
  final payload = await request.readAsString();
  final data = jsonDecode(payload);

  // mimic a database insert
  data['id'] = (users.length + 1).toString();
  users.add(data);

  return Response.ok(
    {
      'message': '${data['id']} added successfully',
      'status': 'success',
    },
    headers: {'Content-Type': 'application/json'},
  );
}
updateUser Function - Update an Existing User: PUT /api/v1/users/<id> Updates the details of an existing user identified by the ID.
Future<Response> updateUser(Request request) async {
  final id = request.params['id'];
  final existingUserIndex = users.indexWhere((u) => u['id'] == id);

  if (existingUserIndex == -1) {
    return Response.notFound('User not found');
  }

  final payload = await request.readAsString();

  final updateData = jsonDecode(payload);

  // Update the user data accordingly
  users[existingUserIndex] = updateData;

  return Response.ok(
    jsonEncode(users[existingUserIndex]),
    headers: {'Content-Type': 'application/json'},
  );
}
deleteUser Function - Delete a User: DELETE /api/v1/users/<id> Removes a user from the list based on the provided ID.
Response deleteUser(Request request) {
  final id = request.params['id'];
  final userIndex = users.indexWhere((u) => u['id'] == id);
  if (userIndex == -1) {
    return Response.notFound('User not found');
  }
  users.removeAt(userIndex);
  return Response.ok('User deleted successfully');
}
Each function corresponds to a specific HTTP method and route, performing actions such as retrieving, creating, updating, or deleting users. The getUserById, updateUser, and deleteUser functions use the id path parameter to identify the relevant user. The addUser and updateUser functions process JSON data from the request body to create or update users. These functions collectively enable your API to handle CRUD operations for the User’s resource.
Defining Routes
Add routes to the router for handling requests to the User resource:
final router = Router()
  ..get('/api/v1/users', getUsers)
  ..get('/api/v1/users/<id>', getUserById)
  ..post('/api/v1/users', addUser)
  ..put('/api/v1/users/<id>', updateUser)
  ..delete('/api/v1/users/<id>', deleteUser);
Each route is associated with an HTTP method and a handler function. The <id> in the URL pattern is a path parameter that allows the handlers to identify specific users.
Deployment
Now that our backend is written and functional, the next crucial step is to deploy it onto a server where users can access it. While there are multiple ways to deploy a Dart backend, each comes with its complexity and knowledge that you may still need to gain. Conversely, Globe offers an efficient solution, especially for backends that focus on pure business logic, like our fake API, which handles everything you need to run a web server.
Our backend, being a pure logic implementation, does not involve any external dependencies such as databases, caches, or complex integrations, making it an ideal candidate for deployment on Globe’s platform.
Here’s how you can get started with Globe:
-
Install Globe CLI: Globe provides a command-line interface (CLI) for easy interaction. To install it, run:
dart pub global activate globe_cliThis command installs the Globe CLI globally using Dart’s package manager.
-
Login to Globe: Once the Globe CLI is installed, authenticate with your Globe account:
globe loginFollow the prompts to log in. If you don’t have a Globe account, you’ll be guided to create one.
-
Deploy Your Application: Navigate to your Dart project directory.
Run:
globe deploy --prodFollow the on-screen instructions to deploy your Dart backend. Globe will guide you through configuring your deployment, including setting up environment variables, choosing a region, and more.
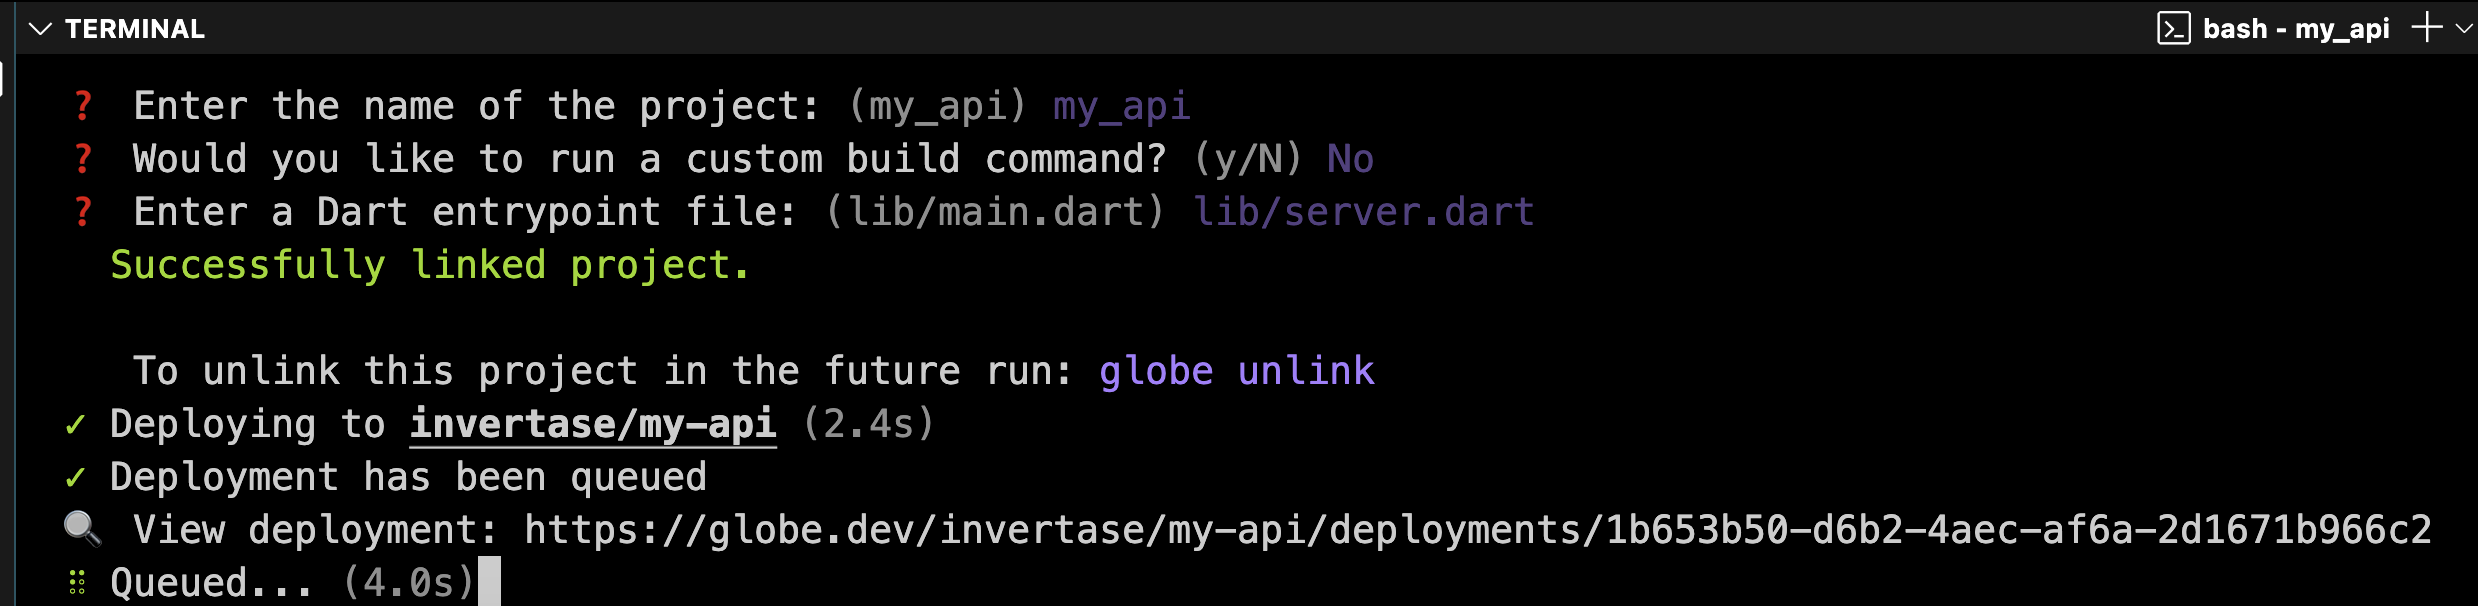
Once deployment is over, you will have access to your production link. For example, in my utility backend, here is the link https://dart-fake-api.globeapp.dev/
-
Monitor and Manage Your Deployment: Globe provides tools to monitor and manage your application after deployment. You can easily view logs, update your deployment, or roll back to previous versions if needed. Check the Globe Dashboard.

Globe also helps connect your GitHub repository and lets you deploy automatically by git push.

One of the useful features in Globe is the power to give you a preview link with each deployment or git push. You can test your feature before you deploy your application to production; you need to run globe deploy. This feature is much more challenging to achieve in the typical ways we explored in this article.

With Globe, deploying your Dart backend becomes a straightforward and hassle-free process. You can rapidly deploy, update, and manage your applications, allowing you to focus more on development and less on deployment complexities. Globe handles the underlying details, offering a user-friendly approach to deploying Dart backends in the cloud.
Dart Frontend
Now that you have created your API, it can be utilized by any front-end application. Let’s now start using our API in a Flutter application. Here is a typical HTTP call using FutureBuilder
class MyHomePage extends StatelessWidget {
  const MyHomePage();

  @override
  Widget build(BuildContext context) {
    final uri = Uri.https('dart-fake-api.globeapp.dev', '/api/v1/users');
    return Scaffold(
      appBar: AppBar(title: Text('Testing dart-fake-api.globeapp.dev')),
      body: FutureBuilder(
        future: http.get(uri),
        builder: (context, snapshot) {
          if(snapshot.hasError){
            return Center(child: Text('Something went wrong!'));
          }
          if (snapshot.hasData) {

            return Container();
          }
          return Center(child: Text('No Users Yet!'));
        },
      ),
    );
  }
}
You can also see the final result on Zapp.run
You may encounter an error block since we are using a web application and Zapp runs on the web. This issue might not arise if you use the API directly on an emulator or mobile phone, but it does occur on the web. This is where you may face one of the most common errors in remote APIs, CORS.

What is CORS?
CORS stands for Cross-Origin Resource Sharing. It’s a security feature in web browsers that restricts web applications from making requests to a different domain than the one that served the web application. This is done to prevent malicious scripts on one site from interacting with sensitive content on another.
To fix CORS issues, you must typically configure the server to include specific HTTP headers. The most important header is Access-Control-Allow-Origin, which can be set to the domains allowed to access the resources or * for allowing any domain (though this is less secure). Other headers like Access-Control-Allow-Methods and Access-Control-Allow-Headers can specify allowed methods (like GET, POST) and headers.
Here’s a basic example of setting CORS headers in an HTTP response:
Access-Control-Allow-Origin: https://example.com
Access-Control-Allow-Methods: GET, POST
Access-Control-Allow-Headers: Content-Type
In this example, only requests from https://example.com are allowed, and only GET and POST methods are permitted with the Content-Type header. This setup must be implemented on the server side, typically in the web server configuration or the code that handles HTTP responses.
To solve this problem in your shelf backend, you can either manipulate the headers yourself or use a middleware for shelf that handles cors out of the box. For this tutorial, let’s use the package [shelf_cors_headers](https://pub.dev/packages/shelf_cors_headers).
dependencies:
  shelf_cors_headers: ^0.1.5
Then, add this middleware to your server pipeline.
// optionally override default headers
  final overrideHeaders = {
    ACCESS_CONTROL_ALLOW_ORIGIN: '*',
  };
// Configure a pipeline that logs requests.
  final handler = Pipeline()
      .addMiddleware(logRequests())
      .addMiddleware(corsHeaders(headers: overrideHeaders))
      .addHandler(router);
Remember to deploy your backend by running globe deploy for preview or globe deploy --prod for production.
Once you are done, you can check your Flutter web app on Zapp again and see that your client is now receiving data.
Deploying Flutter Web to Globe
One feature of Globe is hosting Flutter web with smart hashing to leverage CDN and the edge network. The deployment process is the same as what you would do for your backend. Globe can automatically detect if your project is a Flutter project and add a Flutter preset to assist with building and deploying.

Once the process is done, you can access your Flutter web running on Globe. Here is my final link for this project https://mockdash-flutter-client.globeapp.dev/
Serving HTML from a Dart Backend
In addition to handling RESTful API requests, Dart backends can also serve HTML content, allowing you to create web pages that can be accessed through a browser. This capability is helpful for various purposes, such as displaying documentation, dashboards, or even a simple homepage for your API.
Here’s a guide on how to serve HTML content from a Dart backend using the Shelf package:
Defining the HTML Content
First, define the HTML content you want to serve. In this example, we have a simple HTML page with Tailwind CSS for styling and a custom header:
final homepageTemplate = '''
<!DOCTYPE html>
<html lang="en">
  <head>
    <meta charset="UTF-8" />
    <meta name="viewport" content="width=device-width, initial-scale=1.0" />
    <title>Fake REST API on Edge</title>
    <script src="<https://cdn.tailwindcss.com>"></script>
    <script>
      tailwind.config = {
        theme: {
          extend: {
            colors: {
              clifford: '#da373d',
            },
          },
        },
      };
    </script>
    <style>
      .response-box {
        background-color: #e0e0e0;
        margin-top: 20px;
        padding: 10px;
        width: 100%;
        height: auto;
        overflow: auto;
        white-space: pre-wrap;
      }
    </style>
  </head>
  <body class="bg-gray-100">
    <header class="bg-gray-800 text-white text-center p-8">
      <h1 class="text-5xl font-bold">
        Your REST API Assistant On Edge Written in Dart
      </h1>
    </header>
  </body>
</html>
''';
This HTML template is stored as a string in the homepageTemplate variable. You can customize this template as needed.
Creating a Route Handler for HTML Content
Next, define a route handler in your Shelf application that returns this HTML content:
Response rootHandler(Request req) {
  return Response.ok(
    homepageTemplate,
    headers: {'Content-Type': 'text/html'},
  );
}
rootHandler: A function that handles HTTP requests to the root path (/).Response.ok: Creates a response with a 200 OK status code. The first argument is the response body, and the second is a map of headers. Setting theContent-Typeheader totext/htmlindicates that the response is an HTML document.
Configuring the Router
Configure the router to use the rootHandler for the root path:
final router = Router()
  ..get('/', rootHandler);
Router(): Instantiates a new router.get('/',rootHandler): Configures the router to userootHandlerfor GET requests to the root path (/).
Now, if you deploy your application, you should be able to see your backend’s home page serving this HTML.
Source code
The complete source code for this tutorial can be found on Globe example repository
Conclusion
This tutorial presented a brief approach to backend development in Dart, focusing on creating a RESTful API for a stateless backend. We discussed the key concepts, walked through the process of building a mock API, and finally showed how to deploy the backend using Globe.
Indeed, this scratched the surface, and there is more to cover. In the upcoming articles on the Globe blog, we can cover them all and help you build your backend in Dart as smoothly as possible.